 Here are many ways of cooling and heating your home. However, increasingly, Suffolk homeowners are turning to the heat pump system for heating and cooling for their homes. Not only is this system more cost-effective in terms of running costs, it is also conducive to the environment in the long run as it is energy efficient.here are many ways of cooling and heating your home. However, increasingly, Suffolk homeowners are turning to the Suffolk heat pumps systems for heating and cooling for their homes. Not only is this system more cost-effective in terms of running costs, it is also conducive to the environment in the long run as it is energy efficient.
Unlike other HVAC systems such as the furnaces that create heat by burning fuel, the heat pump system draws heat from the atmosphere. Therefore, it does not require the burning of fuel to provide heat as the source of heat is the ambient heat in the air outside the house. However, you should note that this system of heating and cooling your house is best installed if you live in an area that does not experience sub-freezing temperatures frequently.
The installation of such as system, owing to its complexity, is best handled by professionals. However, if you are skilled in implementing a complex DIY project and you are up for a challenge, you will love installing your heat pump. Herein is a guide of how to install an air-source heat pump system.
Requirements And Steps To Take While Installing Heat Pumps In Suffolk
For this particular job, you will the following tools:- A drill,- Tape,- Cable tie,- Level,- Pliers,- Wire stripper,- Hammer, and a- Hole saw.
Step #1. Obviously, the first step is to search of a quality heat pump that suits your budget as well as having the capacity fulfill your needs.
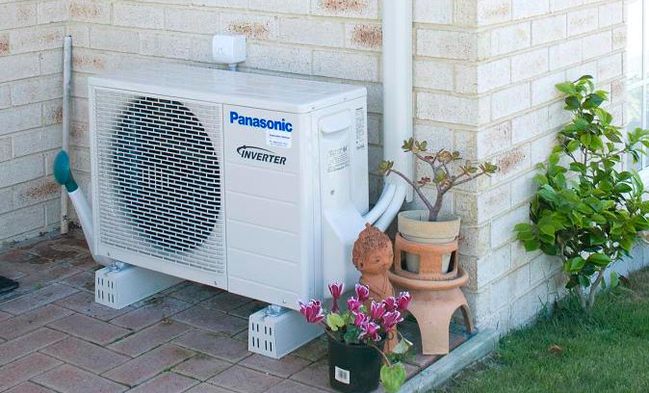
Step #2. Install The Condenser – After purchasing your system, begin the installation project by installing the condenser. The condenser is the bit in the system that converts the heat and transfers the air to your house. You need to find a suitable place outside the house – a place that is at least 4’ away from the house and a place that provides at least 20’ of clear air above and at the front of the machine.Drill the holes where you will mount the condenser, either on the wall or on the ground. While at it, you should also drill a hole for the lines, keeping in mind that the inside end of the hole is where you will install the air handler.
Step #3. Install The Air Handler – The air handler is the device that releases the warm or cold air into your house. Find a place that is at least 2’ from your ceiling, far away from a heat source such as your TV, and within 30” of the condenser (taking into consideration the connecting cable). Screw the mounting plate and make 3’ for the connecting lines to pass through. Connect all the requisite lines (the control wire, the refrigerant, and the condensate hose). Thereafter, attach the air handler onto the mounting plate ensuring that all the lines are in the hole drilled in the wall.
Step #4. Connect The Condenser And The Air Handler – Connecting the cable involves connecting condenser to a circuit breaker. Thereafter, you should connect the control wire from the condenser unit to the air handler. Follow this by connecting the refrigerant line between the air handler and condenser unit. Finally, connect a vacuum pump and a gauge to the refrigerant line for leak detection. Finally, install the cover to the condenser and hide any unsightly lines in the system.
By installing your heat pump as a DIY project, you reduce the overall cost of having a new HVAC system in your home as you do not have to pay for professional labour.